Kubernetes (K8s) is one of the best platforms for automating the deployment, scaling, and operation of application containers. This open-source container orchestration system is notable for having a secrets management feature called Kubernetes Secrets.
Examples of Kubernetes vulnerabilities
Kubernetes Secrets are not encrypted. They are stored in Etcd in base64, which is an encoding method, not encryption. This means anyone with Admin permissions to the Kubernetes cluster can read your secrets.
However, you are not limited to using this built-in feature to handle your secrets. You can use other solutions like Akeyless Vault, which offers a simple and reliable way of managing K8s secrets. It is a seamless system designed to be easy to deploy and scale. Akeyless comes with both vault-as-a-service and on-premises deployment options, and it also comes with automation features.
To get started, use this concise review on how to manage Kubernetes secrets with Akeyless Vault.
Is Kubernetes becoming the driving force of enterprise IT?
How It Works
Akeyless’s secrets management platform adds complete protection to your Kubernetes secrets by providing extra layers of security while encrypting secrets using decentralised encryption. It uses Distributed Fragments Cryptography, ensuring that key fragments are never combined, leading to zero-visibility of your secrets and keys.
In this document/demo, we are going to describe how to leverage static and dynamic secrets sourced from Akeyless Vault. This plugin leverages the Kubernetes Mutating Admission Webhook to intercept and augment specifically annotated pod configuration for secrets injection using Init and Sidecar containers.
Applications need only concern themselves with finding a secret at a filesystem path, rather than managing tokens, connecting to an external API, or other mechanisms for direct interaction with secrets management systems.
Sidecar containers fetch secrets before an application starts, i.e., to be used by a web application that is using dynamic secrets to connect to a database with an expiring lease.
What you need
Before you can use Akeyless Vault, you need to make sure that you have kubectl installed. If you are not sure how to go about with this, refer to the comprehensive kubectl installation and setup guide at the Kubernetes website.
After this, you can proceed to sign in to your Akeyless Vault account. If you don’t have an account yet, you can quickly sign up for one. The process takes only a couple of minutes.
Creating and managing secrets with Akeyless Vault – Review
The process is relatively easy. You just have to create a secret, set an authorisation method, set up a role, and update the configuration file.
1. Creating a secret
On the Akeyless Vault interface, click on the blue New button. Doing this will display the following options: Encryption Key, Static Secret, Dynamic Secret, SSH Cert Issuer, and PKI Cert Issuer. Select Static Secret.
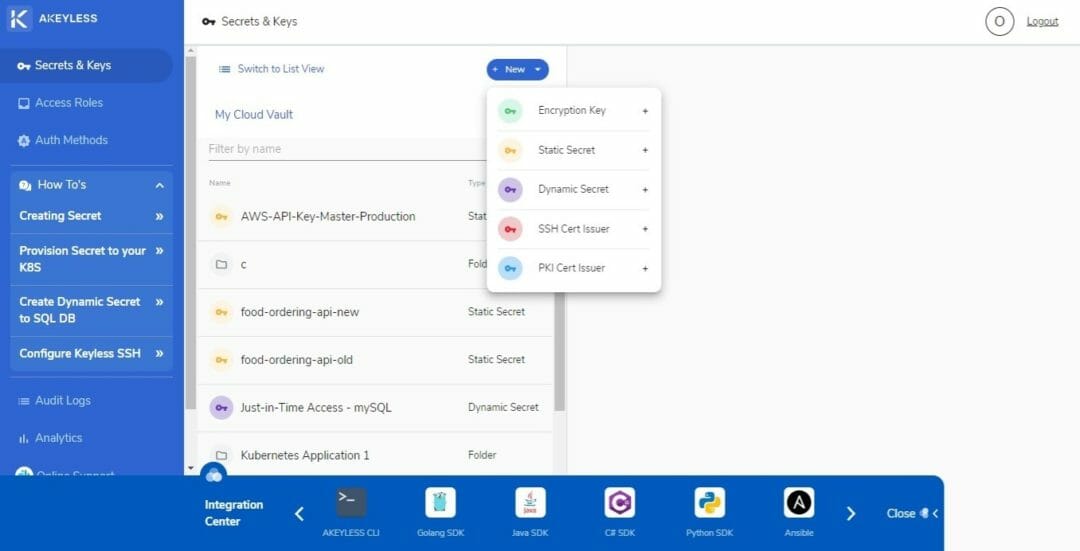

You can enter anything in the Name field. It can be a single or multiple words consisting of letters, numbers, symbols, spaces, and characters from other languages.
The location field does not require you to write an already existing location. In Vault, this location is virtual. Enter a new location as you deem appropriate. You can write “/SecretsVAult/K8s/Secrets”, for example. It does not have to follow a pre-existing path, but you have to come up with logical folder arrangements. In the example, “Secrets” is the root folder, “K8s” is the application, and “Secrets” is the virtual folder where the newly created secret will be stored.
The Description is optional. You don’t have to enter anything in this field, but it would be great if you can put something to guide other users on what the secret is about.
In the Value field, you can enter any character type, with the maximum length set at 16KB. If you need a zero-knowledge approach, you can select a key that is associated with your customer fragment to achieve zero-knowledge (so that Akeyless will have a zero visibility into your secrets).
2. Creating an authentication method
To set an authentication method, click on the Auth Methods option on the left sidebar to display the following options: API Key, Open ID, SAML, LDAP, Azure Active Directory, and AWS IAM. Since this example is about Azure, select Azure Active Directory.
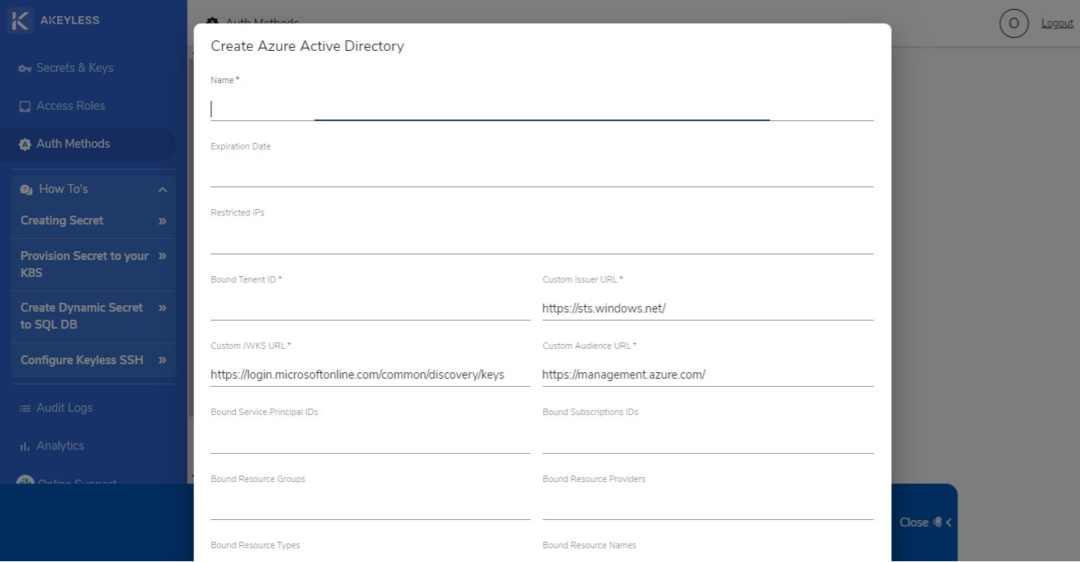
You will be asked to enter the fields shown on the screen above.
The Expiration Date field lets you set a date in Unix timestamp. You can enter 0 if you don’t want to have an expiration date for the authentication method.
The Restricted IP field is for entering a CIDR whitelist of the IPs that the authorization method is restricted to.
The Bound Tenant ID indicates the Azure tenant ID that the authentication method is allowed to access.
On the other hand, the custom JWKS URL refers to the URL for the JSON Web Key Set that bears the public keys that will be used in verifying any JSON Web Token generated by the authentication server.
The rest of the “Bound” fields indicate the IDs, groups, subscription IDs, resource groups, resource providers, resource types, and names that the authentication method access is restricted to.
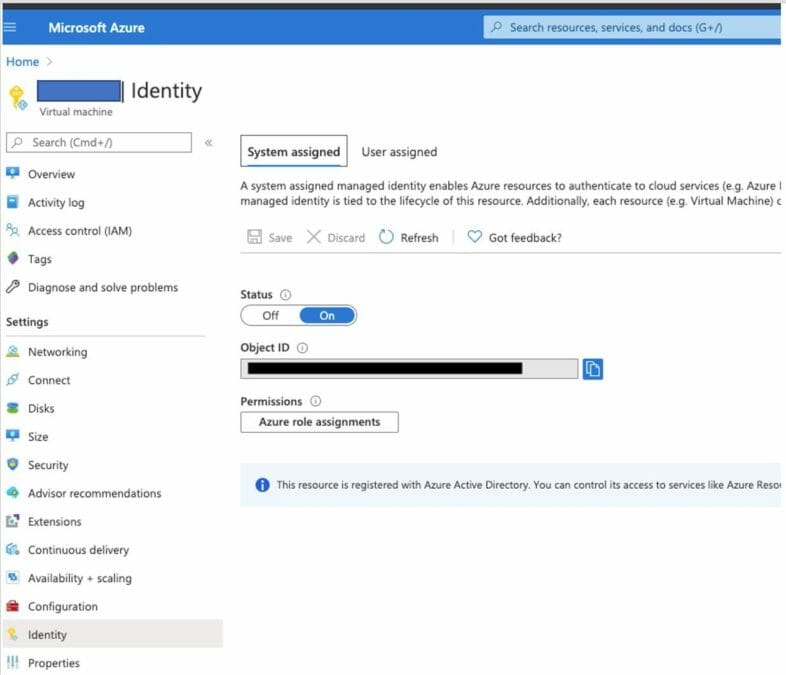
By the way, before you create an authentication method for Azure AD, you need to set your Virtual Machine (VM) on Identify in the Microsoft Azure interface, as shown below:
For other platforms, you can refer to the Authentication Methods how-to guides provided by Akeyless. Click on the Documentation link on the bottom part of the left sidebar and find the Authentication Methods section.
3. Creating a role
The Role function allows you to set the permissioned rights to paths or access to be granted to a user. To start, click on the Access Roles option on the left sidebar. Then click on the New button. You can enter whatever name you prefer. In most cases, roles are distinguished for the clients (Human and Machines). The admin role appears in the list of Access Roles by default.
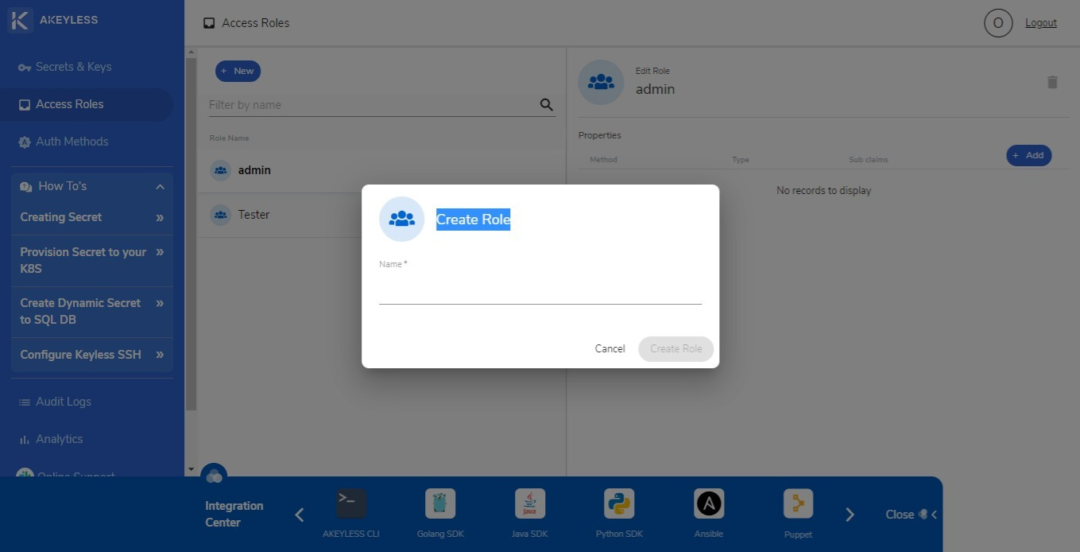
Once you have entered a name for a role, you can proceed to editing its permissions or access. You can set an authentication method and sub claims specific to the role. You can also limit the role to a specific location path and specify if the role has Create, Read, Update, Delete, List, or Deny permissions. A role can have one, many, or all of these permissions.
4. Updating the configuration file
The last step in provisioning secrets to K8s is the configuration file update. You need to reflect all the names and settings you created in the appropriate files with your access ID, in this case the Azure access ID, the AZ cluster, and examples/pod.yam.
For AZ Access ID, the file will look like this:

For the az-cluster:

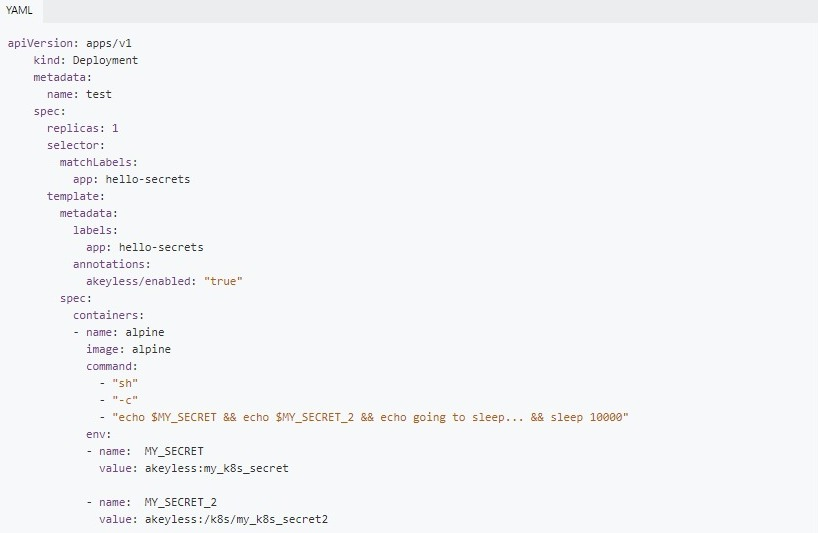
For examples/pod.yam:
While you can use the integrated Secrets function in Kubernetes, it does not provide the same level of security, centralisation, and simplified secrets management that Akeyless offers. Additionally, Akeyless Kubernetes plugin can be used to inject secrets to K8s pods through a sidecar. This makes it possible for containerised applications to use static and dynamic secrets stored in Akeyless Vault.
Sign up now for Akeyless Vault with K8s to get started with better security and efficiency in managing Kubernetes secrets.